本文 主要解读下apollo中RTK定位模块,基于apollo7.0版本。
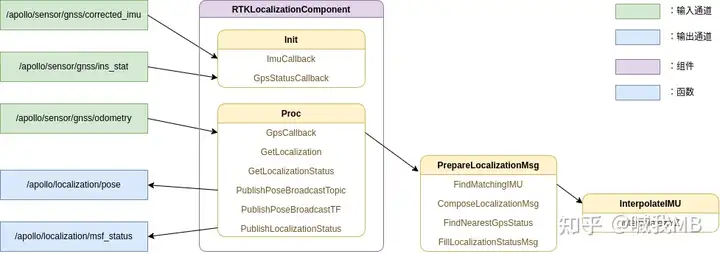
RTK组件框架 从消息传递的角度来看,rtk主要订阅下图左上角这三个由惯导驱动发过来的定位数据,同步imu与odometry这两个信息,最终发布同步完的定位信息。
这里的关键点就是如何实现这三个消息的同步,apollo这边是把imu跟ins_stat这两个信息先分别保存在两个列表中,然后在读到odometry信息后在保存的列表里找到最匹配的信息来同步,匹配过程主要用反距离加权插值法实现。
文件目录 首先整体看下定位模块的工程目录,它主要包含msf,ndt与rtk这三种定位的实现。我们主要关注rtk这个目录。
1
2
3
4
5
6
7
8
9
10
11
localization ├── BUILD // 编译文件 ├── common // flags声明 ├── conf // 配置文件 ├── dag // cyber DAG流 ├── launch // 启动文件 ├── msf // ndt与rtk融合定位 ├── ndt // ndt定位 ├── proto // 消息定义 ├── rtk // rtk定位 └── testdata // 测试数据
rtk这个目录很简单全都是源码文件,根据这里的BUILD文件我们可以很方便地理清这些文件的依赖关系。
1
2
3
4
5
6
7
rtk ├── BUILD ├── rtk_localization.cc ├── rtk_localization_component.cc ├── rtk_localization_component.h ├── rtk_localization.h └── rtk_localization_test.cc
程序入口 在rtk_localization_component.cc文件下。
Init()函数 首先看下Init()函数,他主要完成如下工作:
用reset方法初始化一个tf广播器
从rtk_localization.pb.txt文件中读取配置信息
初始化发布订阅器
然后我们主要进来看下第三步,它创建了两个Reader跟Writer,其中这两个Reader在收到相应的消息后就会调用相应的回调函数。
1
2
3
4
5
6
7
8
9
10
11
12
13
14
15
16
17
18
19
20
bool RTKLocalizationComponent::InitIO () corrected_imu_listener_ = node_->CreateReader <localization::CorrectedImu>( imu_topic_, std::bind (&RTKLocalization::ImuCallback, localization_.get (), std::placeholders::_1)); ACHECK (corrected_imu_listener_); gps_status_listener_ = node_->CreateReader <drivers::gnss::InsStat>( gps_status_topic_, std::bind (&RTKLocalization::GpsStatusCallback, localization_.get (), std::placeholders::_1)); ACHECK (gps_status_listener_); localization_talker_ = node_->CreateWriter <LocalizationEstimate>(localization_topic_); ACHECK (localization_talker_); localization_status_talker_ = node_->CreateWriter <LocalizationStatus>(localization_status_topic_); ACHECK (localization_status_talker_); return true ; }
ImuCallback()函数 1 2 3 4 5 6 7 8 9 10 11 12 ```c++ void RTKLocalization::ImuCallback( const std::shared_ptr<localization::CorrectedImu> &imu_msg) { std::unique_lock<std::mutex> lock(imu_list_mutex_); if (imu_list_.size() < imu_list_max_size_) { imu_list_.push_back(*imu_msg); } else { imu_list_.pop_front(); imu_list_.push_back(*imu_msg); } }
它的逻辑很简单,首先看下imu_list_是咋定义的,它是一个列表,用来存放实时收到的imu数据。
1 2 std::list<localization::CorrectedImu> imu_list_;
列表有容量大小,只要容量还够就直接用push_back方法把新到的消息加到列表最后面,如果满了就先把最前面的老消息弹个出去然后再把新的加在末尾。
Proc()函数 它主要完成如下工作:
调用GpsCallback函数实现三个消息的同步
然后发布同步完的消息跟tf
GpsCallback()函数 我们看下它是咋同步的
由于要跟imu与gps_status同步,首先要确保这两个列表都有数据
确认有数据后就可以用PrepareLocalizationMsg方法来同步了
最后调用RunWatchDog函数来监测定位数据发送的实时性
PrepareLocalizationMsg()函数 那就来到PrepareLocalizationMsg函数,看下它的实现。
1 2 3 4 5 6 7 8 9 10 11 12 13 void RTKLocalization::PrepareLocalizationMsg ( const localization::Gps &gps_msg, LocalizationEstimate *localization, LocalizationStatus *localization_status) double gps_time_stamp = gps_msg.header ().timestamp_sec (); CorrectedImu imu_msg; FindMatchingIMU (gps_time_stamp, &imu_msg); ComposeLocalizationMsg (gps_msg, imu_msg, localization); drivers::gnss::InsStat gps_status; FindNearestGpsStatus (gps_time_stamp, &gps_status); FillLocalizationStatusMsg (gps_status, localization_status); }
它的逻辑也很清晰,根据传进来的当前gps_msg消息,找到列表中最匹配的imu_msg,然后用ComposeLocalizationMsg方法将他们组合成LocalizationEstimate 类型的消息(及最终定位模块输出的定位信息)。
同样gps_status也是先找到跟当前gps_msg时间戳最近的消息,然后给定位状态信息赋值。
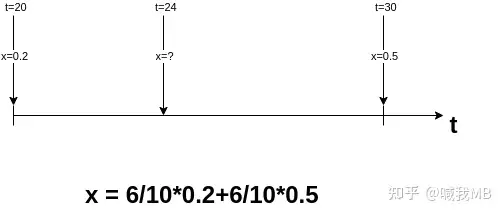
FindMatchingIMU()函数 按顺序我们先看下FindMatchingIMU这个函数,代码有点多但不复杂,可以直接看下图来理解,这是正常找到匹配的imu消息然后插值的情况。
为啥要插值呢,看上图gps_msg跟匹配到的imu_msg时间上肯定有一点点小偏差,所以实际我们想确定的imu状态应该在图上的imu_msg 3与imu_msg 4之间,所以就需要插值来获取更为精确的imu状态。
下面是代码,可以跟着我的注释来理解。
1 2 3 4 5 6 7 8 9 10 11 12 13 14 15 16 17 18 19 20 21 22 23 24 25 26 27 28 29 30 31 32 33 34 35 36 37 38 39 40 41 42 43 44 45 46 47 48 49 50 51 52 53 54 55 56 57 58 59 60 61 62 63 64 65 66 67 68 69 70 71 72 73 bool RTKLocalization::FindMatchingIMU (const double gps_timestamp_sec, CorrectedImu *imu_msg) if (imu_msg == nullptr ) { AERROR << "imu_msg should NOT be nullptr." ; return false ; } std::unique_lock<std::mutex> lock (imu_list_mutex_) ; auto imu_list = imu_list_; lock.unlock (); if (imu_list.empty ()) { AERROR << "Cannot find Matching IMU. " << "IMU message Queue is empty! GPS timestamp[" << gps_timestamp_sec << "]" ; return false ; } auto imu_it = imu_list.begin (); for (; imu_it != imu_list.end (); ++imu_it) { if ((*imu_it).header ().timestamp_sec () - gps_timestamp_sec > std::numeric_limits<double >::min ()) { break ; } } if (imu_it != imu_list.end ()) { if (imu_it == imu_list.begin ()) { AERROR << "IMU queue too short or request too old. " << "Oldest timestamp[" << imu_list.front ().header ().timestamp_sec () << "], Newest timestamp[" << imu_list.back ().header ().timestamp_sec () << "], GPS timestamp[" << gps_timestamp_sec << "]" ; *imu_msg = imu_list.front (); } else { auto imu_it_1 = imu_it; imu_it_1--; if (!(*imu_it).has_header () || !(*imu_it_1).has_header ()) { AERROR << "imu1 and imu_it_1 must both have header." ; return false ; } if (!InterpolateIMU (*imu_it_1, *imu_it, gps_timestamp_sec, imu_msg)) { AERROR << "failed to interpolate IMU" ; return false ; } } } else { *imu_msg = imu_list.back (); if (imu_msg == nullptr ) { AERROR << "Fail to get latest observed imu_msg." ; return false ; } if (!imu_msg->has_header ()) { AERROR << "imu_msg must have header." ; return false ; } if (std::fabs (imu_msg->header ().timestamp_sec () - gps_timestamp_sec) > gps_imu_time_diff_threshold_) { AERROR << "Cannot find Matching IMU. IMU messages too old. " << "Newest timestamp[" << imu_list.back ().header ().timestamp_sec () << "], GPS timestamp[" << gps_timestamp_sec << "]" ; } } return true ; }
InterpolateIMU()函数 那么如何插值呢,接下来就是插值函数,这里用的是易于理解的反距离加权插值法,可以结合下图先来看下。
假设t=24这个时间是我们要插值的位置,根据时间间隔,靠得近的t=20比较近它的权重就应该大,反之则小,这样就可以推算出t=24要插的值。
根据原理出发来看代码应该就很好理解了。
1 2 3 4 5 6 7 8 9 10 11 12 13 14 15 16 template <class T >T RTKLocalization::InterpolateXYZ (const T &p1, const T &p2, const double frac1) T p; double frac2 = 1.0 - frac1; if (p1.has_x () && !std::isnan (p1.x ()) && p2.has_x () && !std::isnan (p2.x ())) { p.set_x (p1.x () * frac2 + p2.x () * frac1); } if (p1.has_y () && !std::isnan (p1.y ()) && p2.has_y () && !std::isnan (p2.y ())) { p.set_y (p1.y () * frac2 + p2.y () * frac1); } if (p1.has_z () && !std::isnan (p1.z ()) && p2.has_z () && !std::isnan (p2.z ())) { p.set_z (p1.z () * frac2 + p2.z () * frac1); } return p; }
这里frac1是前一个imu_msg跟当前gps_msg时间戳的距离,p就是对应时间戳的消息内容。
ComposeLocalizationMsg()函数 主要用来构建最终发出去的定位消息,他是借助mutable_XXX()跟set_XXX()这类函数来填充消息的,has_XXX()是判断消息里是否有数据。
LocalizationEstimate 消息类型定义在proto目录下的localization.proto文件里。
1 2 3 4 5 6 7 8 9 10 11 12 13 14 15 16 17 18 19 20 21 22 23 24 25 26 27 28 29 30 31 32 33 34 35 36 37 38 39 40 41 42 void RTKLocalization::ComposeLocalizationMsg ( const localization::Gps &gps_msg, const localization::CorrectedImu &imu_msg, LocalizationEstimate *localization) localization->Clear (); FillLocalizationMsgHeader (localization); localization->set_measurement_time (gps_msg.header ().timestamp_sec ()); auto mutable_pose = localization->mutable_pose (); if (gps_msg.has_localization ()) { const auto &pose = gps_msg.localization (); if (pose.has_position ()) { mutable_pose->mutable_position ()->set_x (pose.position ().x () - map_offset_[0 ]); mutable_pose->mutable_position ()->set_y (pose.position ().y () - map_offset_[1 ]); mutable_pose->mutable_position ()->set_z (pose.position ().z () - map_offset_[2 ]); } if (pose.has_orientation ()) { mutable_pose->mutable_orientation ()->CopyFrom (pose.orientation ()); double heading = common::math::QuaternionToHeading ( pose.orientation ().qw (), pose.orientation ().qx (), pose.orientation ().qy (), pose.orientation ().qz ()); mutable_pose->set_heading (heading); } if (pose.has_linear_velocity ()) { mutable_pose->mutable_linear_velocity ()->CopyFrom (pose.linear_velocity ()); } } ... }
代码重复性很高,后面的代码我就用…省略了。
FindNearestGpsStatus()函数 跟FindMatchingIMU很像,主要也是用迭代器遍历整个gps_status_list_,唯一区别就是它找的是整条list里时间差最小的消息,可能它接收的消息不是按时间先后顺序有序排列的。
1
2
3
4
5
6
7
8
9
10
11
12
13
14
15
16
17
18
19
20
21
22
23
24
25
26
27
28
29
30
bool RTKLocalization::FindNearestGpsStatus (const double gps_timestamp_sec, drivers::gnss::InsStat *status) CHECK_NOTNULL (status); std::unique_lock<std::mutex> lock (gps_status_list_mutex_) ; auto gps_status_list = gps_status_list_; lock.unlock (); double timestamp_diff_sec = 1e8 ; auto nearest_itr = gps_status_list.end (); for (auto itr = gps_status_list.begin (); itr != gps_status_list.end (); ++itr) { double diff = std::abs (itr->header ().timestamp_sec () - gps_timestamp_sec); if (diff < timestamp_diff_sec) { timestamp_diff_sec = diff; nearest_itr = itr; } } if (nearest_itr == gps_status_list.end ()) { return false ; } if (timestamp_diff_sec > gps_status_time_diff_threshold_) { return false ; } *status = *nearest_itr; return true ; }
FillLocalizationStatusMsg()函数 跟ComposeLocalizationMsg函数功能一样,我就说下这个函数输入的两个参数吧。
drivers::gnss::InsStat 消息类型定义在apollo根目录的modules/drivers/gnss/proto/ins.proto文件里,而LocalizationStatus 就定义在当前目录的proto/localization.proto里。
1
2
3
4
5
6
7
8
9
10
11
12
13
14
15
16
17
18
19
20
21
22
23
24
25
26
27
28
29
30
31
32
33
void RTKLocalization::FillLocalizationStatusMsg ( const drivers::gnss::InsStat &status, LocalizationStatus *localization_status) apollo::common::Header *header = localization_status->mutable_header (); double timestamp = apollo::cyber::Clock::NowInSeconds (); header->set_timestamp_sec (timestamp); localization_status->set_measurement_time (status.header ().timestamp_sec ()); if (!status.has_pos_type ()) { localization_status->set_fusion_status (MeasureState::ERROR); localization_status->set_state_message ( "Error: Current Localization Status Is Missing." ); return ; } auto pos_type = static_cast <drivers::gnss::SolutionType>(status.pos_type ()); switch (pos_type) { case drivers::gnss::SolutionType::INS_RTKFIXED: localization_status->set_fusion_status (MeasureState::OK); localization_status->set_state_message ("" ); break ; case drivers::gnss::SolutionType::INS_RTKFLOAT: localization_status->set_fusion_status (MeasureState::WARNNING); localization_status->set_state_message ( "Warning: Current Localization Is Unstable." ); break ; default : localization_status->set_fusion_status (MeasureState::ERROR); localization_status->set_state_message ( "Error: Current Localization Is Very Unstable." ); break ; } }
至此消息同步的主要工作已经做完,接下来就是把消息发布出去了。
PublishPoseBroadcastTF()函数 回到Proc()函数,PublishPoseBroadcastTopic跟PublishLocalizationStatus这两个发布函数很简单就是直接之前初始化的发布器调用Write()方法即可
然后就是tf发布函数,tf的赋值操作跟上面定位消息的赋值一样,因为它也是protobuf生成的,我就提下它的路径吧,在apollo的modules/transform/proto/transform.proto文件里。
1
2
3
4
5
6
7
8
9
10
11
12
13
14
15
16
17
18
19
20
21
22
23
void RTKLocalizationComponent::PublishPoseBroadcastTF ( const LocalizationEstimate& localization) apollo::transform::TransformStamped tf2_msg; auto mutable_head = tf2_msg.mutable_header (); mutable_head->set_timestamp_sec (localization.measurement_time ()); mutable_head->set_frame_id (broadcast_tf_frame_id_); tf2_msg.set_child_frame_id (broadcast_tf_child_frame_id_); auto mutable_translation = tf2_msg.mutable_transform ()->mutable_translation (); mutable_translation->set_x (localization.pose ().position ().x ()); mutable_translation->set_y (localization.pose ().position ().y ()); mutable_translation->set_z (localization.pose ().position ().z ()); auto mutable_rotation = tf2_msg.mutable_transform ()->mutable_rotation (); mutable_rotation->set_qx (localization.pose ().orientation ().qx ()); mutable_rotation->set_qy (localization.pose ().orientation ().qy ()); mutable_rotation->set_qz (localization.pose ().orientation ().qz ()); mutable_rotation->set_qw (localization.pose ().orientation ().qw ()); tf2_broadcaster_->SendTransform (tf2_msg); }
总结 说下整体看下来的感受吧,我认为Apollo的rtk定位模块还是挺适合入门者学习的。